
Build ARM64 Docker Images using a Gitlab Runner
Build ARM64 Docker Images using a Gitlab Runner on locally hosted ARM64 hardware (Raspberry Pi) or an ARM64 cloud instance.

Gitlab is a git repository (and a lot more) that can be self-hosted. One of the main features I use Gitlab for is to automatically build docker images using the integrated CI/CD pipelines. Gitlab can execute these build pipelines on "Gitlab Runner" instances. Gitlab Runner's perform the heavy lifting of executing the build in which they then send the results back to Gitlab when the task is complete.
I try to write my Dockerfile(s) to be multi-platform or multi-architecture so that my images are portable between ARM64 and AMD64 environments whenever possible.
Example of a multi-arch Apache Guacamole Dockerfile I use in my environment:
https://gitlab.largenut.com/unsafetypin/docker-guacamole/-/blob/1.5.3-postgres-11/Dockerfile
Getting Started
This guide is aimed at self-hosted or as Gitlab calls it, "Self Managed" Gitlab environments.
I'm going to be running this Gitlab Runner locally on a Raspberry Pi 5 Model B.
Prerequisites:
- A live Gitlab environment
- ARM64 hardware - such as a Raspberry Pi 5
- Other options
- Set-up an ARM64 Oracle Cloud free-tier instance - https://www.oracle.com/cloud/free/
- Set-up a paid ARM64 Instance at another cloud provider (Hetzner Cloud, AWS, etc.)
- Network connectivity or VPN between the Runner and Gitlab
- Your runner hardware will have to be able to reach your Gitlab instance and Gitlab registry to store your built container images via IP and be able to resolve their DNS names.
Setup the Gitlab Runner
Retrieve the Gitlab runner instance registration token:
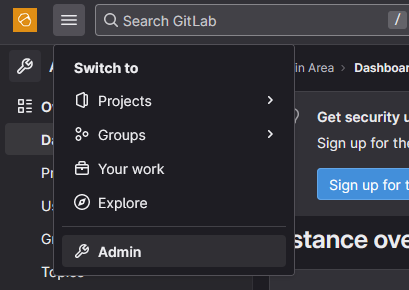
To get started, we need to navigate to the Admin area of our Gitlab instance.
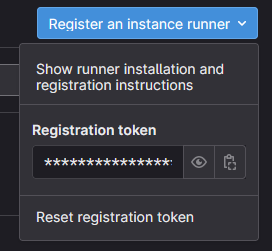
From the Admin area, navigate to CI/CD > Runners.
Click the drop-down for "Register an instance runner". This will show a registration token. Take note of this token somewhere handy like Notepad++ until needed.
Setup Docker on your ARM64 device or instance
Update APT cache and packages
After initial setup, its good to make sure all packages are up to date before getting started with our setup.
apt-get update && apt-get upgrade -ySetup docker environment
apt-get update
apt-get install curl
curl -fsSL https://get.docker.com -o get-docker.sh
sh get-docker.sh
If this quick setup doesn't fit your environment, check out https://docs.docker.com/engine/install/.
Create a docker-compose.yml file for the Gitlab Runner container
mkdir /opt/gitlab-runner
cd /opt/gitlab-runner
nano docker-compose.yml
version: '2'
services:
gitlab-runner-arm:
image: yobasystems/gitlab-runner
dns:
- 10.0.0.172 # Change this to your DNS server
- 10.0.0.192 # Change this to your DNS server
privileged: true
restart: unless-stopped
volumes:
- /opt/gitlab-runner/data:/etc/gitlab-runner
- /var/run/docker.sock:/var/run/docker.sockdocker-compose.yml
Fetch Gitlab Runner token using the registration token
The next step will need the Gitlab runner token. This token is different from the registration token. To get this, we will curl your Gitlab instance's API to get a response with the token using the registration token previously written down. Be sure to replace everything shown with <>.
Take note to the tag list, change this if needed. I use tags to specify for my pipeline configurations to run the ARM builds specifically on the ARM Gitlab runners. This can also be changed later on in your Gitlab admin area.
curl --request POST "https://<Gitlab-URL>/api/v4/runners" --form "token=<Registration Token>" --form "description=<Runner description>" --form "tag_list=aarch64"
The response will look something like this:
{"id":4,"token":"6D_Huu_hjsd663e_Quuf7C","token_expires_at":null}In this case "6D_Huu_hjsd663e_Quuf7C" is the Gitlab runner token.
Create a config.toml file for the Gitlab Runner
cd /opt/gitlab-runner
mkdir ./data
cd /opt/gitlab-runner/data
nano config.toml
Be sure to change everything shown in <> below. Note: the token field is the token we previously retrieved.
concurrent = 1
check_interval = 0

[session_server]
  session_timeout = 1800

[[runners]]
  name = "<Instance Name>"
  url = "https://<Gitlab URL>" # Change this
  token = "<TOKEN>" # Change this
  executor = "docker"
  [runners.custom_build_dir]
  [runners.cache]
    [runners.cache.s3]
    [runners.cache.gcs]
    [runners.cache.azure]
  [runners.docker]
    tls_verify = false
    image = "alpine"
    privileged = true
    disable_entrypoint_overwrite = false
    oom_kill_disable = false
    disable_cache = true
    volumes = ["/var/run/docker.sock:/var/run/docker.sock", "/cache"]
    shm_size = 0
    helper_image = "gitlab/gitlab-runner-helper:arm64-latest"
    dns = ["<Primary-DNS-IP>","<Secondary-DNS-IP>"] # Change this
config.toml
Bring up your Gitlab Runner container
cd /opt/gitlab-runner
docker-compose up -d
At this point you should see the Gitlab Runner show up in your Admin area in your Gitlab instance:
